31 December 2009

We Had The Neighbours Over for Lunch


I've been meaning to post more about the house, but somehow other things kept taking precedence. Today was such a good day for avian neighbours, though, that I was finally prompted to blog.


With the exception of bald eagles and ravens, who tend to fly overhead but not stop in, I saw every kind of bird today that I had seen at the the house so far, plus a couple of new visitors.


We have two suet feeders, which are frequented by black-capped chickadees, bluejays and downy woodpeckers. We've had large flocks of chickadees, who are entirely fearless and cheerful little birds. I can't say how many have visited at once, because they don't stay still long enough to count. As for bluejays--who like both the suet and the loose seeds--we usually get five or six at a time, but I've seen as many as twelve flitting about the yard at once.


The downys tend to stop by singly, but there are at least two of them; we've spotted a male and a female (the males have a red spot on the back of their head). There is a flock of mourning doves who visit the loose seed (and who will even chase off the bluejays, if they get too obnoxious). The number varies, but I think there may be six or seven altogether.


There are also at least two crows who visit regularly, but unlike city birds, they're quite shy and keep their distance from the house. They fly into the trees if anyone goes outside, but I think they're beginning to figure out that a person outside often means tasty things to eat. One of them is a relatively small bird, and the other is so large I keep checking the shape of his (or her) tail to make sure it is actually a big crow, and not a small raven.
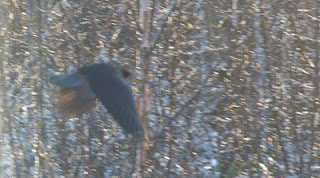

Today, I glanced out the window and saw--to my surprise and delight--that the black and white, red head-spotted woodpecker clinging to the nearest suet feeder was much larger than our usual downy visitors. It was a shyer bird, a hairy woodpecker. He sat and ate off one feeder while the little female downy had her lunch on the other. I ran upstairs to get my camera, but he flew off just as I was adjusting the focus (which is what also happened with the crow photo, except I managed to snap a poorly exposed pic of him flying away).

The other new visitors were three (or maybe more) tree sparrows. They look much like house sparrows, except they have very reddish brown heads and eye-stripes. According to my bird book, they're winter visitors. They didn't pay any attention to the suet, but instead hopped around pecking at the remnants of the seeds left by the jays.

I also experimented with some leftover bacon grease from this morning's breakfast. I always hate to just throw it away, as it seems like something the local wildlife would enjoy. So this afternoon I mixed a bunch of bird seed into it and made it into a sort of mushy cake on a scrap of wood, then put it out on the picnic table to see what would happen. The bluejays loved it. They don't always like to get so close to the window when we're right inside watching, but there were as many as five at a time pecking at the bacon seedcake. So now I have a use for bacon grease.


Photos, from top to bottom (all by Niko):
  • Bluejay on a suet feeder.
  • Black-capped chickadee on one of the suet feeders, on the table because too many bluejays at once broke the hanging chain.
  • Female downy woodpecker on suet feeder
  • Male downy woodpecker on suet feeder, restored to its hanging position with the help of some twine
  • A bluejay and a mourning dove (look close, she's brown and hard to spot)
  • Crow, who decided he didn't like the look of my camera and flew away as I was pressing the shutter release
  • A bluejay laying claim to the bacon seedcake.
27 December 2009

Contest! Win a Flying Machines Calendar


A contest seems like a nice way to finish off one year and begin another, so from now until January 6th, I'm going to run a contest here on my blog. Those of you who've entered blog contests before will be familiar with the format. The more you help me spread the word about my blog and my shops, the more entries you get.

Things that will get you one entry each:

  • choose your favorite item from one of my shops (Etsy here and here, ArtFire here) and leave a comment on this blog post

  • heart one of my Etsy shops

  • choose your favorite post from this blog and mention it in a comment

  • follow my blog

  • follow me on Twitter (@anagramforink)

  • retweet the Twitter post announcing this contest

  • become a fan of my Facebook page

  • recommend my Facebook page to your friends

  • watch me on deviantArt, or fave one of my deviations


If you buy something in one of my shops, you'll get two entries; spend $50 or more and get five entries. Make sure you post a comment here letting me know what you did, so I won't miss any. Also make sure your email address is in your post or your profile so I can contact you if you win.

The prize: one of only 30 hand-printed letterpress flying machine 2010 calendars. See this blog post for more photos and info on how I printed it, and find it here and here in my online shops.

In the delightful but unlikely event that I get lots of people entering, I'll add another prize. If lots and lots enter, I'll add a third prize, and so on. (As for how many = "lots," I'm not really sure. 25? 30? Some number dependent on whim? Probably.)

19 December 2009

2010 Flying Machines Calendar!

On Tuesday I finished the last printing I needed to get done before the new year: my 2010 "Flying Machines: possible and improbable" calendar.


On Thursday I trimmed, hole-punched and packaged all 30 of them, and of course signed and numbered them. I had already pre-sold two at the Halifax Crafter's Market, and had two other people interested in buying when they were finished. So I've now sold 5, will keep one for my files, and will probably use 5 or so for gifts. So that leaves 19 for sale in my Etsy shop and my ArtFire shop.

The calendars are printed on one of my favourite (non-handmade) papers for letterpress: Mohawk Via Vellum 80 lb cover. The 100 lb is nice, too, but doesn't fold as well for greeting cards, so I usually buy the 80. The vellum finish gives it a soft texture that doesn't interfere with the printing as heavily textured papers sometimes do. I chose warm white for this, rather than my usual cool white--although cool white tends to have less affect on the ink colour, the warm white seemed better suited to the subject matter, and goes well with the brown ink.

I printed the names of the months first, using a different historic wood type from the Dawson Printshop's collection for each month. I added a lot of transparent base to the ink, and printed relatively lightly in order to get all the texture and imperfections of the old wooden type to show up. For printing the wood type, I used the shop's Vandercook Universal 1 proof press.

Then I printed the numbers and the images at the same time, from polymer plates. I used quite a bit of packing on the cylinder to bring up the pressure and get a nice deep embossment (technically debossment, I suppose). The letters for the days of the week were printed the same way, only with a different colour of ink, of course. The polymer plates were all printed on the shop's Vandercook Universal 2 proof press, a very rare press (apparently only 50 or so were made).

All of the images except two are ones that I found in my various history of flight books (I have a small collections). Many of them are Victorian, and a few of them were in full colour, which meant I had to remove the colour in Photoshop before converting the files to vectors. The two images that weren't ones from my own books came from a file of miscellaneous images on the Printshop computer. Some of the machines pictured actually flew, while others are simply exercises in imaginations.

I'm going to post a contest here soon, where you'll be able to win a copy of the calendar. I think what I'll do is make it a trivia contest, where you'll have to identify some of the machines--maybe which ones actually flew, for example. More on that very soon.

16 December 2009

Letterpress, Not Screen Print

Despite the many print jobs I've had in the past few weeks, I still managed to design and print two new holiday cards. Well, I cheated a little on the design, and took one of the motifs from my first design, enlarged it, added to it a little, and printed it on its own.

I started by drawing the images by hand, then I scanned them and opened the files in Illustrator. I used live trace to convert the images to vectors, which generally print much better than, say Photoshop files. Once I was happy with the designs, I had to separate the colours (which was easy since I only used two colours in one card and one for the other, so all I had to do was select the relevant parts and drag them to a new file), then convert everything to registration black.

Registration black--that is, black that will be printed with CM and Y as well as K, and not just the black ink cartridge--is necessary to make the negative dense enough to block light. I send my files off to a pre-press guy, who sends me back a negative. I cut the pieces for the different plates apart and then use a platemaker to create the images on polymer. After washing with soft brushes to remove the unexposed polymer, the plates are dried and then cured in the sun. I leave them to cure for at least 24 hours before printing.

I tried to print the single reindeer card with a split fountain (there's no actual ink fountain on the press, but it's basically using two--or more--colours on the same press; in litho class we called it a "rainbow roll"), and you can see from the photo that it looks great on the rollers and even on the plate. Look at the image of all the printed cards, though, and you can see that they dried in a solid grey-blue. I'm still not sure quite why that happened.


I also printed a two-colour card with 3 reindeer, but neglected to photograph it in process.

Interestingly, everyone who saw the reindeer card at the craft fair thought it was either a screenprint or a die-cut until I showed them how the relief printing created an embossed effect where the white deer shape is raised above the surface because the coloured areas were pressed into the paper with so much pressure. I guess I have to learn how to design letterpress images that look like letterpress.

Photo credits: Top = polymer plates for holiday cards and 2010 calendar. Second = two inks at once on the press and the plate. Third = a whole pile of reindeer cards, printed and drying. Bottom = my booth at the Halifax Crafter's Christmas Fair. A little crowded, but each time it looks a little better. All photos by Niko Silvester, taken with an iPhone.

Experiments In Coptic Binding

One of the jobs that's kept me so busy these past few weeks was a binding job for a friend of mine to give as a gift. (I won't mention who the friend is or who the gift was for, on the slender chance that the surprise could be spoiled. I don't think the recipient is likely to come across my blog, but you never know).

The specifications were for a journal, with reasonably nice writing paper (nothing expensive) and a leather cover, with the recipient's initials blind-tooled on the front. My friend found an image of some journals she liked the look of--the spine wasn't visible in the photograph she sent, but they were either Coptic or longstitch (an evolution of Coptic), with exposed stitching on the spines. I've done similar books before, though with hard covers rather than limp leather.

I used Classic Laid paper for the text block (for those who don't do books, "text block" is the stack of pages, regardless of whether or not they actually have text on them). It's kind of the go-to paper for anyone who learned binding with Joe Landry. It's relatively inexpensive, but has a traditional-looking laid finish and feels quite nice. And though it's textured, it's not so textured that it's difficult to write or draw on.

For the cover I got some very nice, but also inexpensive, chocolate-brown cow leather. With this kind of cover, you need a thicker leather than you would use on a hardcover with leather spine. The leather itself is both the cover and the sewing support, so it needs to be strong.

I laid out and punched the sewing holes for longstitch, then went looking for a diagram to refresh my memory of the sewing pattern. And of course I couldn't find one. Not in my books and not online. And I seem to have mislaid some of my binding notes. While looking online, though, I found a really nice Coptic stitch that uses two needles for each thread, and a separate thread for each pair of holes. It turned out to be even better for the sewing holes I'd punched than my original idea.

I made a practice book first, since I hadn't done one quite like it before (it's the top one in the photo). Then I went on to the real thing, after deciding to do three pairs of holes instead of two (because of the larger size). I ended up juggling six needles at once, but I think the result was worth it. And my friend was very happy when she got the book in the mail (it's the bottom one in the photo).

I had the practice book on my table at the Halifax Crafter's Christmas Market, but I was not at all sad when it didn't sell. I've had my eye on it myself to use as a naturalist journal. Of course, I could always make another one.

Photo credit: Coptic stitch blank journals bound and photographed by Niko Silvester.